
If you trade without predefined exits, the market will eventually decide them for you. Learning how to set stop-loss and take-profit on Binance is one of the most practical skills for protecting capital and locking in gains. This step-by-step guide shows you exactly how to do it on Spot and Futures, including OCO (One-Cancels-the-Other), Stop-Limit vs Stop-Market, Reduce-Only, Trailing Stop, and partial take-profits—plus tested risk frameworks you can apply immediately.
- 20% trading fee discount
- $30,050 signup bonus
- 20% trading fee discount
- $100 signup bonus
- $10,000 futures bonus
- 20% fee cashback
- $10,000 bonus
- 20% fee cashback
- $60,000 futures bonus
- 50% trading fee discount
- 20% fee cashback
- $6,200 futures bonus
- 20% fee cashback
- $8,000 bonus
- Bonus pack worth $100–$1,500 USDT
- Fee discount
Tip: New to Binance? You can get a 20% fee discount and access up to $10,000 in welcome benefits when you register with this referral: Join Binance with code CRYPTONEWER.
Why Stops and Targets Matter
- Stop-loss: An order that exits your trade if price moves against you. It caps downside and prevents catastrophic losses.
- Take-profit: An order that exits once price hits your target. It helps you bank gains without watching the screen.
- OCO: One order for take-profit and one for stop-loss; when one triggers, the other cancels automatically (Spot).
- Stop-Limit vs Stop-Market: Stop-Limit gives you a trigger (Stop) and a Limit execution price; Stop-Market triggers and fills at market price to prioritize execution.
- Mark Price vs Last Price (Futures): Mark Price is used to avoid unfair liquidations; you can choose which price source triggers your TP/SL.
- Trailing Stop: A dynamic stop that moves with price by a set callback percentage, aiming to let winners run.
Risk reminder: Crypto derivatives are complex and can be highly volatile. Nothing here is financial advice. Trade within your risk tolerance.
Before You Start
- Create and verify your account: Register on Binance — use code CRYPTONEWER for 20% fee discount
- Enable Spot and, if needed, Futures trading in your account settings.
- Fund your wallet and choose Cross or Isolated margin for Futures (Isolated limits risk to that position’s margin).
- Decide your risk per trade (example: 0.5–1% of account balance).
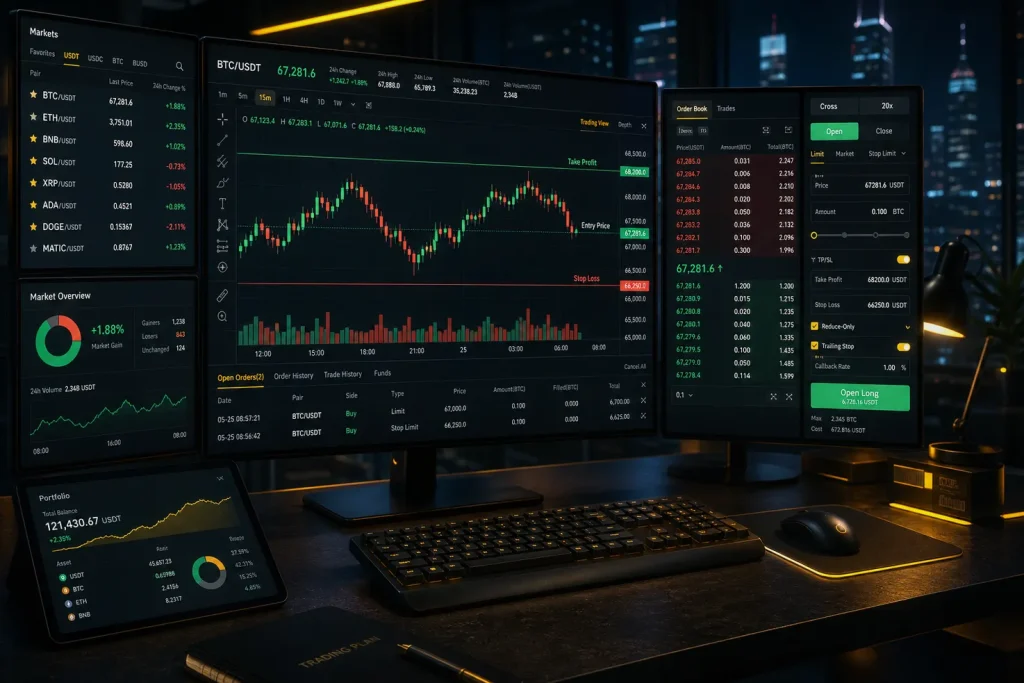
How to Set Stop-Loss and Take-Profit on Binance Spot (with OCO)
Use OCO to place both your stop-loss and take-profit at the same time for the same position.
1) Select a trading pair on Spot (e.g., BTC/USDT) and confirm you hold the asset you plan to sell.
2) In the order panel, choose “OCO” (under the Sell section if you’re long and want to protect/exit your position).
3) Fill the fields for an OCO Sell:
– Price: Your take-profit limit price (e.g., 63,000 USDT for BTC).
– Stop: The stop trigger price (e.g., 58,500).
– Limit: The limit price to place after the stop triggers (e.g., 58,400 to improve fill odds).
– Amount: Quantity to sell.
4) Submit. If price hits 63,000, your take-profit executes and the stop cancels. If price falls to 58,500, the stop triggers a limit sell at 58,400 and your take-profit cancels.
Example scenario:
– You bought BTC at 60,000.
– OCO Sell:
– Price (TP): 63,000
– Stop: 58,500
– Limit: 58,400
– Amount: 0.25 BTC
– Result: You either lock profit at 63,000 or limit your loss near 58,400.
Notes for Spot:
– If the market gaps below your Limit, the order may remain unfilled. For guaranteed exits, switch to a Stop-Market order (without OCO) and set a separate TP limit.
– Partial exits: Use multiple OCO orders at different targets (e.g., 33% at 63k, 33% at 65k, 34% at 67k), each with the same protective stop (or progressively higher stops as price advances).
How to Set Stop-Loss and Take-Profit on Binance Futures (USDT-M or Coin-M)
On Futures, you can set TP/SL as you place the order or after you’re in the position.
1) Choose a contract (e.g., BTCUSDT Perpetual) and select Cross or Isolated margin.
2) Open a position (Long or Short) with your preferred order type (Limit/Market). Consider “Reduce-Only” when adding exits later to avoid unintentionally increasing size.
3) Set TP/SL as you enter:
– In the order panel, toggle “TP/SL” and input trigger prices before submitting your entry.
– Choose trigger price source: “Last Price” or “Mark Price.” Mark is often better for fairness around volatile spikes.
4) Or set TP/SL after entry:
– Go to Positions > click TP/SL (or Take Profit/Stop Loss) for the specific position.
– Input Take-Profit and Stop-Loss trigger levels. You can select Stop-Market to prioritize execution or Stop-Limit for precision.
– Tick “Reduce-Only” for exits.
5) Use Trailing Stop (optional):
– Set an Activation Price (optional) and a Callback Rate (e.g., 0.7%).
– As price moves in your favor, the stop trails upward (for longs) or downward (for shorts). If price reverses by the callback rate, the stop triggers.
Example (Long futures):
– Entry: Long BTC at 60,000.
– Stop-Loss: 58,500 (Stop-Market, Reduce-Only, trigger on Mark Price).
– Take-Profit: 63,000 (Limit or Market take-profit depending on your preference).
– Partial TPs: Place multiple Limit orders flagged Reduce-Only at 62,000, 63,000, 64,500. Add a Trailing Stop with 0.8% callback once price clears 61,000.
Additional Futures tips:
– “Close on Trigger” ensures your order will close the position even under reduced margin conditions.
– Hedge Mode allows long and short simultaneously; set TP/SL per side.
– Liquidation risk: Setting a stop too close to liquidation is risky. Give room or cut size.
Binance Mobile App — Quick Steps
Spot OCO (Sell):
– Trade > Spot > Pair > Order Type: OCO > Fill Price (TP), Stop, Limit, Amount > Sell.
Futures TP/SL:
– Futures > Pair > Choose Cross/Isolated > Open position > Positions tab > TP/SL > Set triggers (Mark or Last) > Confirm.
Trailing Stop (Futures):
– Positions > Stop > Trailing > Set Callback and (optional) Activation Price > Confirm.
Choosing Your Levels: Practical Frameworks
1) Percentage/Account Risk Method
– Decide account risk per trade (e.g., 1%).
– Calculate position size based on distance from entry to stop.
– Example: Account = $10,000; risk per trade = 1% ($100). Long BTC at 60,000 with stop at 58,800 (risk $1,200 per BTC). Position size = $100 / $1,200 ≈ 0.0833 BTC.
2) ATR (Average True Range) Buffer
– Compute ATR on your timeframe (e.g., 14-period on 1h).
– Place stop beyond structure plus 0.5–1.0x ATR to reduce noise stops.
3) Structure-Based Targets
– TP near prior swing highs/lows, daily levels, VWAP bands, or key moving averages.
– For R:R (risk-to-reward), aim for at least 1.5R–2R in trend setups; scale out as momentum fades.
4) Break-Even and Trail
– After partial TP, move stop to entry or entry plus fees to protect the trade.
– Use Trailing Stop to capture extended runs.
Stop-Limit vs Stop-Market — When to Use Each
- Stop-Market: Highest fill probability. Use during fast moves or when you must exit.
- Stop-Limit: More control on price but risk of non-fill in gaps. Consider it in liquid markets with tight spreads.
- OCO on Spot requires Stop-Limit for the stop leg; if slippage is a concern, consider separate Stop-Market and Limit TP orders.
Common Mistakes and How to Avoid Them
- Setting stop on the wrong side (long with a higher stop, short with a lower stop). Double-check direction.
- Forgetting “Reduce-Only” on Futures exits and accidentally increasing size.
- Using Last Price trigger during wicks. Prefer Mark Price for fairness on Futures.
- Placing Spot Stop-Limits too tight in thin books; add a small buffer.
- Not accounting for fees. Tighter targets may be eroded by taker fees.
- Neglecting partial TPs; all-or-nothing exits can lead to emotional overrides.
Advanced Tactics for Precision
- Laddered TPs: Set 2–4 staggered take-profits and a trailing stop after the first fill.
- Timeframe Alignment: Base stops on your setup timeframe; avoid using 1m stops for 4h entries.
- News Risk: During high-impact events, prefer Stop-Market and smaller size.
- Combine Alerts: Use price alerts to review or tighten stops as levels approach.
- Post-Only for Entries: For precise limit entries; for exits, prioritize execution over maker rebates.
Quick FAQ
- Can I set multiple take-profits? Yes. On Spot, place multiple OCO or Limit orders. On Futures, place multiple Reduce-Only limits.
- Will OCO cancel the other leg automatically? Yes, once one leg fills.
- What if my Stop-Limit doesn’t fill? Consider a wider limit or switch to a Stop-Market exit.
- Which trigger should I use on Futures? Mark Price is generally preferred to avoid wick-induced triggers.
- Can I modify TP/SL after placing? Yes, edit or cancel and re-place as needed.
Your Next Step
- If you’re new to Binance, sign up with this referral to reduce costs and access ongoing perks: Join Binance with code CRYPTONEWER — 20% fee discount plus up to $10,000 in welcome benefits.
- Practice on small size first. Refine your stop logic, then scale once your process is consistent.
Pre-Trade Checklist
- Entry plan defined with invalidation level?
- Risk per trade calculated and position sized accordingly?
- Spot: OCO configured with TP + Stop-Limit (with sufficient buffer)?
- Futures: TP/SL set to Reduce-Only, trigger = Mark Price (if preferred)?
- Trailing Stop planned for momentum continuation?
- Alerts set near key levels to reassess?
- No overexposure across correlated assets?
Related posts:
 Actionable Bitget Mobile App Full Trading Guide for Pro-Level Trading on the Go
 Insider Guide to Useful tips for MEXC That Save Fees and Maximize Rewards
 How Does Bitcoin Work? An Overview In-Depth Breakdown for Curious Builders and Investors
 What is the PIGGY(Piggycell) Coin, and how to buy — a hands‑on, step‑by‑step guide for 2026