If you’ve ever watched a coin ping-pong between support and resistance and thought, “I wish I could harvest every tiny move,” you’re already thinking like a grid trader. This OKX Grid Trading Strategy Tutorial walks you through how grid bots work, when to deploy them, and the exact steps to set up a high-quality configuration on OKX—plus risk controls professionals actually use.
Before we dive in: if you’re opening an account or spinning up a fresh grid, you can support this guide and unlock new-user perks via my referral link. Join OKX with code CRYPTONEWER.
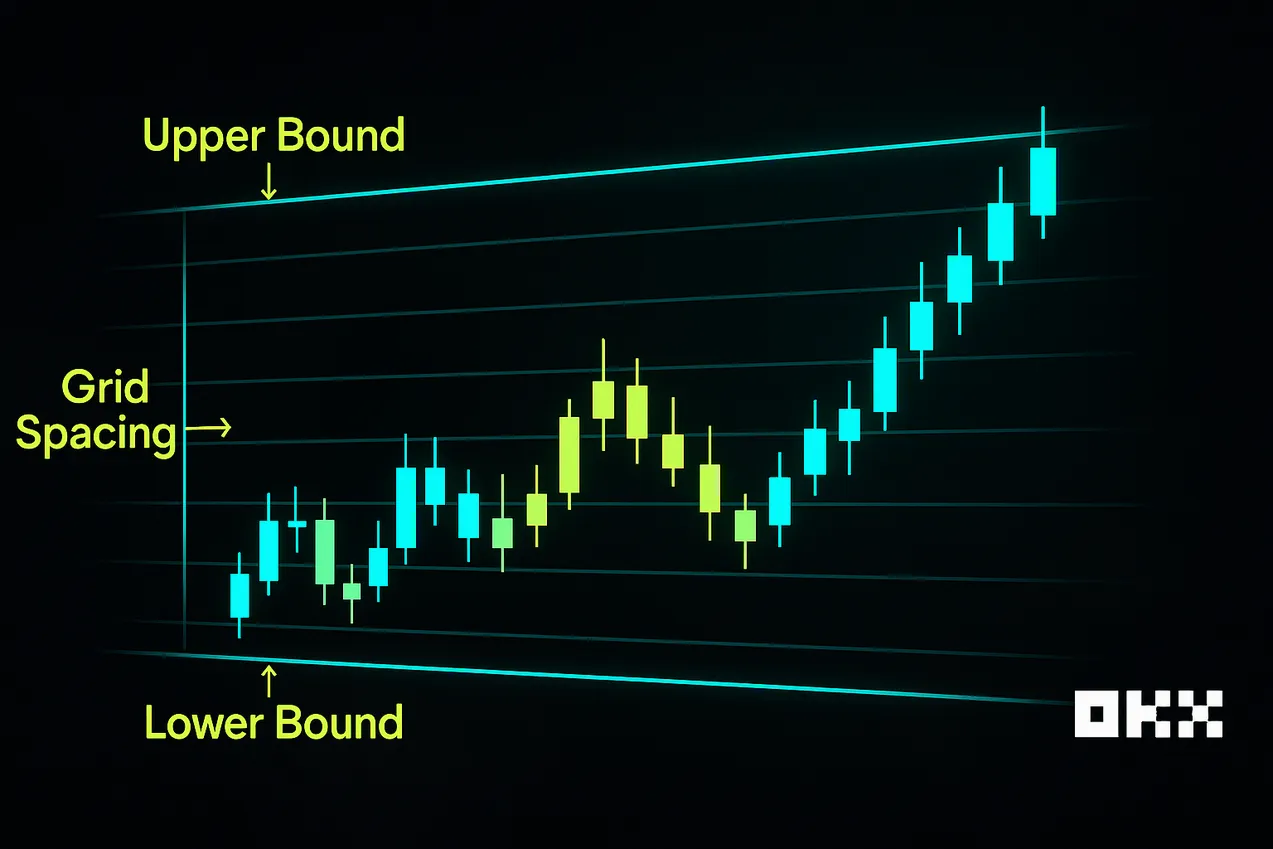
What grid trading is (and isn’t)
Grid trading is a mean-reversion strategy that places a matrix of buy and sell orders within a predefined price range. The bot buys when price dips to a lower grid and sells when price bounces to an upper grid, capturing spread repeatedly. It’s a “volatility harvesting” approach that works best when markets chop or slowly drift within a range.
What grid trading isn’t: a trend-following system. If price one-way-trends hard, your spot grid can accumulate an underwater inventory or your futures grid can rack up losses if misaligned with the trend. That’s why choosing the right market regime and putting guardrails in place is everything.
Why OKX for grid trading
OKX offers fast matching, deep books on majors, and built-in bots for both Spot Grid and Futures Grid. You can choose manual parameters or let the platform suggest “AI” ranges based on historical volatility. The interface exposes key parameters—upper/lower bounds, number of grids, investment, and stop logic—without hiding the advanced stuff. It’s ideal for both first-timers and power users.
- Spot Grid: Accumulates and sells the actual asset within a range.
- Futures Grid: Uses perpetual futures to automate long/short grid logic, with optional leverage. Best used with isolated margin and strict risk rules.
If you don’t have an account yet, start here: Sign up on OKX with referral code CRYPTONEWER.
OKX Grid Trading Strategy basics
Key parameters you’ll set:
- Lower Bound and Upper Bound: The price channel your bot will operate in.
- Number of Grids: How many levels to slice the range into.
- Grid Spacing: The percent gap between grid orders (implied by levels and range).
- Base/Quote Allocation: How much asset vs. stablecoin you allocate (for spot grid) or margin (for futures grid).
- Triggers and Protection: Optional take-profit (TP), stop-loss (SL), and start triggers.
The edge comes from:
- Range selection that aligns with current volatility.
- Spacing wide enough to beat fees and slippage.
- A risk plan for when the market breaks the range.
Step-by-step OKX grid tutorial
1) Choose your market regime
– Best for: range-bound pairs with clean horizontal levels and steady volatility. BTC/USDT and ETH/USDT often qualify during consolidation.
– Avoid: thin-liquidity altcoins with wild gaps unless you widen spacing and size down.
2) Identify the range
– Use daily/4h support and resistance zones. Confirm with multiple touches and wicks.
– Overlay Bollinger Bands (20,2) or a 14-day ATR channel. Your range should comfortably contain recent swings.
3) Translate range into grids
– For chop with medium volatility: 0.5%–1.2% grid spacing is a common starting point on liquid majors.
– For quieter markets: 0.3%–0.6% may be ok, but ensure net edge after fees.
– For altcoins or spikier conditions: 1%–2.5% to reduce overtrading and slippage.
4) Run the numbers before launching
– Target per-fill edge > total cost (fees + slippage). If your taker fee is 0.1% and you expect ~0.03% slippage per side, you want spacing that leaves comfortable room, ideally >0.3% per cycle on majors.
– Favor maker execution where possible; post-only improves net edge when liquidity allows.
5) Configure on OKX
– Navigate to Trading Bots > Grid Trading.
– Pick Spot Grid or Futures Grid.
– Select pair, input Lower and Upper Bounds.
– Choose Grids count or spacing; let the UI compute the other.
– Select investment amount. For spot, distribute between base and quote. For futures, choose isolated margin and conservative leverage.
– Set TP/SL: e.g., SL a few ATR beyond your lower bound; optional TP if price exits the top with strong momentum.
– Review preview, confirm, and monitor initial fills.
6) Monitor and iterate
– Track filled order density. If too few fills, narrow spacing or add more grids. If too many low-edge fills, widen spacing.
– If price hugs one side of the range, consider re-centering or pausing to avoid inventory imbalance.
Proven settings frameworks you can adapt
These aren’t one-size-fits-all “signals”—they’re templates to help you think in ranges and edges.
Framework A: BTC/USDT consolidation play
– Timeframe: 4h trend flat-to-mild drift.
– Range: Identify two horizontal levels with at least 3 touches each.
– Spacing: 0.6%–0.9% per grid.
– Grids: 60–120 depending on range width and capital.
– Capital split: 50/50 base and quote at start, so the bot can buy dips and sell rips.
– SL: 1.5–2.5 ATR below lower bound to avoid stop hunts.
– Optional: Trail the range upward in slow uptrends by manually shifting both bounds every few days.
Framework B: ETH/USDT post-news chop
– After big news, volatility clusters. Use wider spacing initially (1%–1.5%) to let spreads breathe while liquidity normalizes.
– Tighten spacing once spreads and volatility compress.
Framework C: Futures Grid with directional bias
– If macro trend is up but you expect chop: Use a lightly long-biased futures grid.
– Leverage: Keep it low (1x–2x). Higher leverage squeezes tolerance and can nuke your bot in a wick.
– Funding: Monitor funding rates. Frequent positive funding means longs pay; build that into expected carry costs.
– Risk: Isolated margin only; add a hard SL and consider a time-based shutdown ahead of major events (CPI, FOMC, big unlocks).
Choosing the range scientifically
- ATR method: Compute 20-day ATR. Build a channel around the 20-day moving average of roughly 3–5x ATR to encompass typical variance without being overly tight.
- Bollinger method: Use BB(20,2) to frame expected bounds. Set grid bounds slightly outside the bands to reduce stop-outs on pierces.
- Volume profile: Mark high-volume nodes as magnetic areas for mean reversion; align grids so dense trading occurs near those nodes.
Fee math, slippage, and execution
Grid trading thrives on small but repeated edges. Fees matter a lot.
- Maker vs. taker: Maker orders rest on the book and may qualify for lower fees; taker orders cross the spread and cost more. Configure post-only where fills are likely.
- Spread and slippage: On highly liquid pairs during active hours, slippage is minimal; during illiquid hours or on small caps, slippage can swallow your edge.
- Net edge rule of thumb: After both sides of a grid cycle, you want a healthy net >0.25% on majors and more on alts to justify the churn.
Risk management for grid bots
- Position sizing: Start small. 10%–30% of your spot stack per bot is common for beginners. Diversify across pairs rather than over-sizing one grid.
- Stop-loss: If price escapes the range with momentum, an SL prevents deep drawdowns. Set beyond noisy zones, referenced to ATR.
- Inventory controls: Spot grids can accumulate base asset; ensure you’re comfortable holding it if the market drops.
- Event filter: Consider pausing grids 30–60 minutes before high-impact data or listings; restart after volatility settles.
- For futures grids: Isolated margin only, conservative leverage, pre-defined max daily loss. Always respect liquidation thresholds.
Advanced tactics
- Midline rebalance: When price drifts toward one bound, manually re-center bounds around the new median to maintain symmetry.
- Dynamic spacing: Wider grids during high volatility, narrower during compression. You can re-parameterize periodically rather than constantly.
- Staggered bots: Run two bots with different spacing—one coarse for big swings and one fine for micro mean reversion. Turn the fine bot off during news.
- Inventory exit plan: If a spot grid ends with extra base asset after an SL, schedule DCA exits on strength rather than dumping immediately.
- Data-informed grids: Use realized volatility and funding rate dashboards to set spacing and choose spot vs. futures.
Backtesting and live evaluation on OKX
- Backtest proxy: Export historical OHLCV and simulate fills across your chosen grid spacing, including fees and realistic slippage.
- Live PnL decomposition: Separate “grid profit” (completed cycles) from “inventory PnL” (mark-to-market on held asset). Many new users conflate the two.
- Roll-forward adjustments: Periodically lock in a portion of grid profit by narrowing the range or lifting the lower bound in an uptrend.
Common mistakes and quick fixes
- Spacing too tight: You rack up fees with little net edge. Fix by widening spacing or improving maker fill ratio.
- Range too narrow: One impulse breaks your bounds. Use multi-touch levels and ATR-confirmed widths.
- Ignoring fees/funding: Especially on futures, funding can erase your gains. Track and budget for it.
- Over-leverage: A few wicks and your grid is gone. Stay 1x–2x until you’re profitable over months, not days.
- No exit plan: Always define when to pause, stop, or recenter.
A practical launch checklist
- Pair chosen for liquidity and range quality.
- Bounds defined using S/R + ATR or BB.
- Spacing selected to exceed fees and slippage.
- Spot grid: base/quote split set; comfortable with inventory risk.
- Futures grid: isolated margin, low leverage, funding checked.
- SL/TP logic configured and rehearsed.
- Event calendar noted; pause protocol ready.
- Post-only enabled where appropriate to favor maker fees.
- Monitoring schedule set: at least daily check-ins and log of changes.
Getting started on OKX today
If you’ve read this far, you’re ready to implement. The platform’s bot interface is straightforward, and these settings frameworks give you a strong foundation to iterate from. Support the guide and unlock new-user perks here: Start on OKX with code CRYPTONEWER.
Not financial advice. Test small, iterate, and record results. Grid trading rewards patience, discipline, and good data more than any single “magic” setting.