
If you’ve been wondering How to Trade Futures on Binance App safely and efficiently, this hands-on guide walks you through every tap, toggle, and trade setting you’ll see on mobile. Whether you’re just enabling your first Futures account or refining your execution with reduce-only orders and hedge mode, you’ll get a complete walkthrough with risk-first practices.
Pro tip: New users can get a fee edge and generous extras. Register with Binance using the CRYPTONEWER referral link — 20% fee discount + up to $10,000 in benefits.
What You’ll Learn
- How to enable and fund a Binance Futures account on mobile
- USDT-M vs COIN-M contracts, perpetual vs delivery
- Cross vs Isolated margin, setting leverage, and avoiding liquidation
- Order types: Limit, Market, Stop, TP/SL, Trailing Stop, Post-Only, Reduce-Only
- Position Mode (One-way vs Hedge), ADL indicator, risk limits
- Fees, funding rates, and how to keep costs low
- Practical examples and a risk-managed workflow
Quick Disclaimer
Futures are complex and carry a high risk of rapid losses due to leverage. Nothing here is financial advice. Trade only what you can afford to lose. Ensure futures trading is permitted in your jurisdiction and complete any required KYC.
Binance Futures Basics on Mobile
- USDⓈ-M (USDT-M) Futures: Settled in stablecoins like USDT or BUSD; popular for BTCUSDT, ETHUSDT, etc.
- COIN-M Futures: Collateral and settlement in the base coin (e.g., BTC). Useful if you want to hold and margin in crypto itself.
- Perpetual vs Delivery: Perpetual contracts have no expiry; delivery contracts settle on a set date.
- Funding Rate: Paid between longs and shorts every 8 hours (00:00, 08:00, 16:00 UTC on Binance). Positive funding means longs pay shorts; negative means shorts pay longs.
Step 1: Set Up the App and Enable Futures
- Install/update the Binance app and log in.
- Switch to Pro mode (if you see “Lite”): Tap Profile > Settings > App Mode > Pro.
- Enable Futures: Tap Futures on the home screen (or “Trade” > “Futures”). Read the risk disclosure and complete any required quiz.
- Strengthen security: Enable 2FA (Authenticator), set a withdrawal whitelist, and add anti-phishing code.
Get your fee discount and benefits by signing up with code CRYPTONEWER on Binance if you’re new.
Step 2: Fund Your Futures Wallet
- Transfer from Spot to USDⓈ-M (or COIN-M) Futures: Wallets > Overview > Transfer. Choose coin (e.g., USDT), select From: Spot To: USDⓈ-M Futures, Confirm.
- Tip: Keep some balance in Spot for fees or hedges.
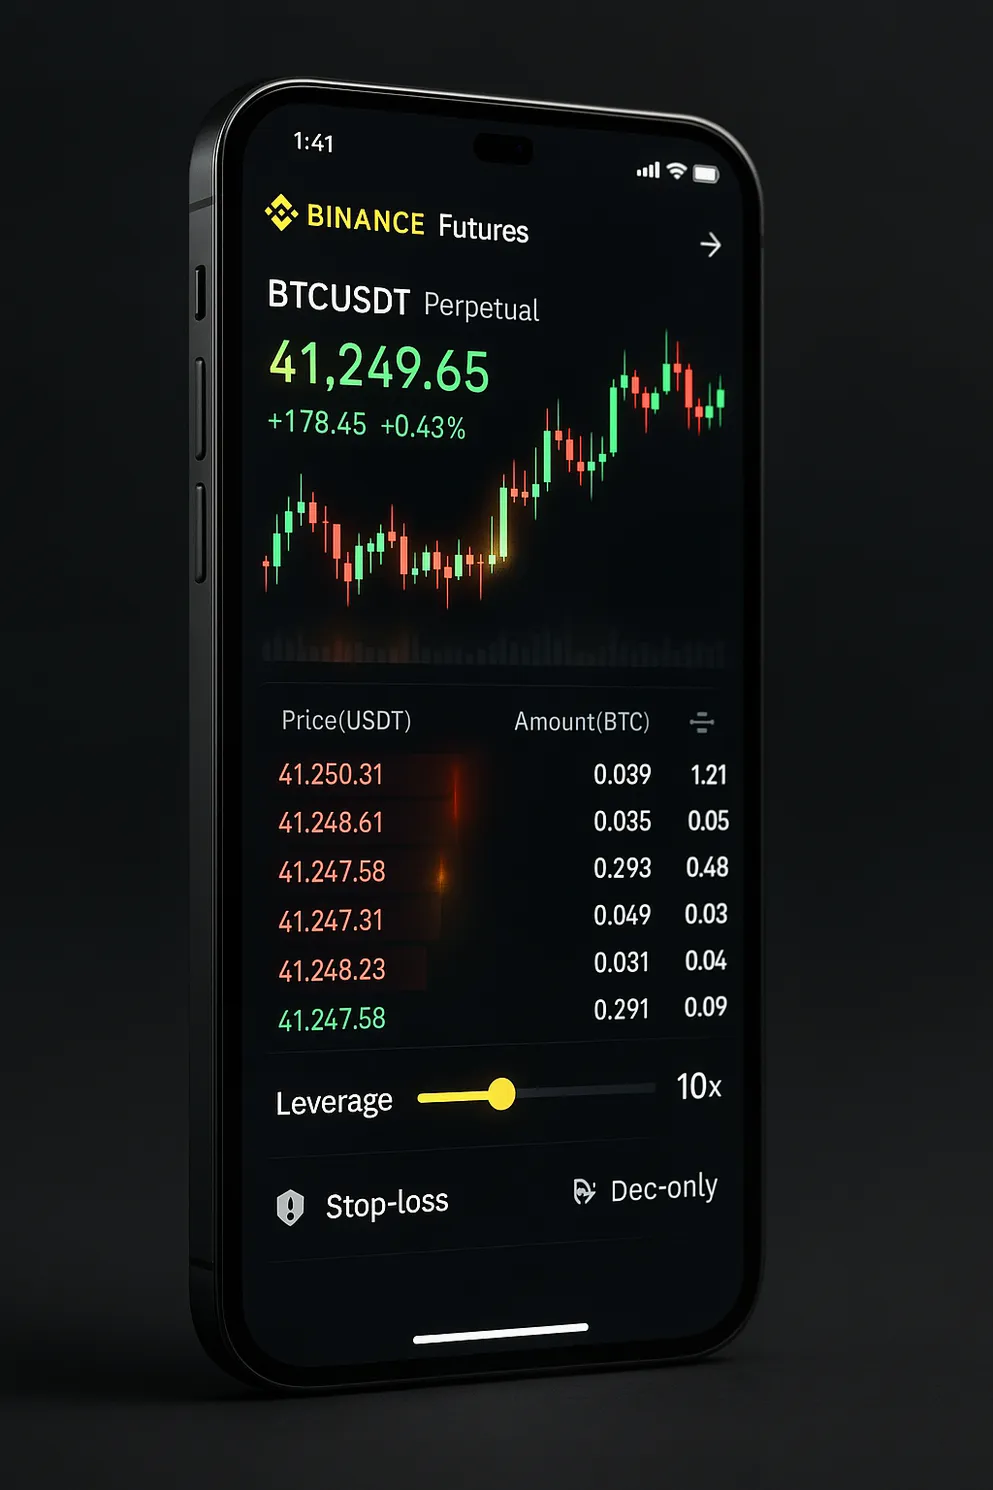
Step 3: Choose Contract and Interface Essentials
- Select Market: Tap the contract name (e.g., BTCUSDT Perp). Search by symbol.
- Chart: Candles, indicators, depth. Use 1h/4h/1d for context; 1–5m for entries.
- Order Panel: Choose order type, margin mode, and leverage.
- Position Metrics: Entry price, mark price, liquidation price, PnL (realized/unrealized), margin ratio.
- Calculator Icon: Quickly compute PnL, liquidation price, and size.
Step 4: Margin Mode, Leverage, and Position Mode
- Cross Margin: Shares balance across positions. Lower liquidation risk per position, but one bad trade can affect all.
- Isolated Margin: Margin contained per position. If liquidated, losses are capped to that position’s margin.
- Leverage: Use the slider or tap the leverage number. Start low (e.g., 3–5x) until you’re consistent.
- Position Mode:
- One-way: Only one net position per symbol (long or short).
- Hedge: Hold long and short simultaneously on the same symbol. Enable via Preferences > Position mode.
Risk guidance: Most beginners benefit from Isolated + modest leverage with pre-set stop-loss.
Step 5: Order Types You’ll Actually Use
- Limit: Set a price to buy/sell; cheaper fees (maker) when posted.
- Market: Instant execution at best available price (taker fee).
- Stop-Limit: Trigger activates a limit order at your chosen price.
- Stop-Market: Trigger activates a market order—useful for hard stops.
- Take Profit (TP)/Stop Loss (SL): Add to existing or planned positions; choose Mark or Last price for triggers.
- Trailing Stop: Dynamic stop that follows price by a set callback rate, useful in trends.
- Post-Only: Ensures your limit order adds liquidity (maker), otherwise it won’t execute.
- Reduce-Only: Order only decreases or closes an existing position; helps avoid accidental flips or size increases.
- Time in Force (TIF): GTC (until canceled), IOC (immediate or cancel), FOK (fill entirely or cancel).
Step 6: A Practical, Risk-Managed Trade Example (Mobile)
Scenario: You have 500 USDT in USDⓈ-M Futures. You want to long BTCUSDT Perp on a pullback with a tight stop.
- Contract: BTCUSDT Perp.
- Margin Mode: Isolated.
- Leverage: 5x.
- Position Sizing: Risk 1% of your account per trade (≈5 USDT). Use the Calculator:
- Tap Calculator > PnL or Liquidation.
- Estimate entry, stop price, and target to gauge size that risks ~5 USDT if stopped.
- Place Entry:
- Order type: Limit at your pullback price.
- Quantity: As per calculator.
- Toggle Post-Only to save fees (optional).
- Set Protection:
- TP/SL: Add Take Profit and Stop Loss with Stop-Market on Mark Price.
- Check Reduce-Only for exit orders.
- Monitor:
- Watch ADL indicator (the 0–5 bars). High ADL risk means you could be auto-deleveraged in extreme moves.
- Track Funding Countdown below the chart; consider funding when holding through cycles.
- Managing the Position:
- Partial Close: Place a Reduce-Only Limit to scale out.
- Move Stop to Breakeven: Adjust SL once price moves favorably.
- Trailing Stop: Switch to Trailing as the trend develops.
Close with a Limit to target price (maker fee) or Market if you need an immediate exit.
Funding, Fees, and Cost Control
- Maker vs Taker: Makers pay lower fees by adding liquidity; takers pay more for immediate fills.
- VIP Levels: Higher volume tiers reduce fees further.
- Funding Rate: Paid/received every 8 hours; visible on the pair screen. High positive funding is a headwind for longs; negative for shorts.
- Slippage: Market orders during high volatility can slip; use Limit with a tolerance or trigger-based stops.
- Fee Savings: New accounts created via the CRYPTONEWER sign-up link receive a 20% fee discount plus up to $10,000 in benefits. Consider holding some BNB for additional fee reductions.
Advanced Settings Worth Knowing
- Price Type for Triggers: “Last” vs “Mark” (mark is less manipulable, often preferred for stops).
- Risk Limits: Bigger size tiers require more initial/maintenance margin, effectively lowering max leverage.
- Price Protection: Helps prevent stop hunting via sudden spikes.
- Leverage Brackets: Each symbol has brackets that change liquidation math; check the Info panel.
- Close-All: Emergency button to flatten positions—know where it is before you need it.
Common Pitfalls and How to Avoid Them
- Oversizing with high leverage: Size by risk, not by slider. Keep a fixed % risk per trade.
- No stop-loss: Always set SL on entry or immediately after.
- Cross mode without understanding: Losses on one trade can consume balance for others.
- Placing TP/SL on the wrong side: Double-check direction in Hedge mode.
- Ignoring funding: Staying long with high positive funding can bleed PnL.
- Trading during illiquid hours: Wider spreads and worse fills—check depth.
A Repeatable Workflow for the Binance App
- Pre-Trade Checklist:
- Trend and level identified on higher timeframe
- News and funding checked
- Risk defined (max % of account)
- Order type and TIF chosen
- Execution:
- Choose Isolated vs Cross, set leverage
- Place entry (prefer maker when possible)
- Add TP/SL with Reduce-Only
- Management:
- Scale out at key levels
- Trail stop as price moves in favor
- Avoid overtrading after a win/loss
- Post-Trade Review:
- Note entry rationale, exit, metrics
- Adjust strategy rules, not emotions
Frequently Asked Questions
-
Do I need KYC to trade Futures?
- Binance generally requires identity verification for Futures. Check local regulations.
-
What is ADL?
- Auto-Deleveraging. In extreme market conditions, your position may be reduced to protect the system if the insurance fund can’t cover bankruptcies. The ADL indicator shows your risk.
-
Can I long and short the same symbol?
- Yes, enable Hedge Mode in Preferences.
-
Why can’t I set very high leverage?
- Position risk limits and brackets restrict leverage at larger sizes.
-
How do I simulate first?
- Binance provides a Futures Testnet (usually via web). Practice sizing, orders, and stops before going live.
Glossary (Speed Round)
- Mark Price: Fair price reference; used for liquidation and often for trigger stops.
- Maintenance Margin: Minimum margin to keep a position open.
- Liquidation Price: Price at which your position is force-closed.
- Maker/Taker: Maker adds liquidity (lower fee), taker removes liquidity (higher fee).
- Reduce-Only: Order can only decrease/close an existing position.
Get Your Fee Edge and Start Smart
If you’re new, improve your cost structure from day one. Open your account with the Binance CRYPTONEWER referral to unlock a 20% fee discount and up to $10,000 in benefits. Then follow the step-by-step process above each time you trade.
For ongoing learning, revisit this guide, experiment small, and keep meticulous records. When in doubt, lower leverage, reduce size, and tighten your process before scaling.
 How to Use MEXC ETF Tokens Actionable strategies for safer leveraged crypto trading
 Blockchain for Environmental Sustainability Proven Strategies for Measurable Climate Impact
 Is Blockchain Really Secure? Demystifying the Trust in Decentralized Tech
 How to Use Leverage on Bybit with Proven Practical Steps